Everyone asks me how I get soft skin. How do I get sparkly eyes. How do I get great light. Well my friends, I will tell you! Well, I’ll TRY to show you how easy it is to get fantastic photos with minimal editing. This post will have lots of photos of my photoshop screen, so it may look scary but I promise it’s not. I encourage for you, if you have any questions, to post them on my FaceBook page (please like it first so I can see your posts and respond). I will be starting a group for people to ask me about my tutorials that I have online so we can all benefit and look back. It will really be for all of you to talk to each other with tips etc, and I will chime in as I have time 😉 That being said I will participate and help when I can. Of course there are SOME things I have to keep a secret 🙂 I love helping out new photographers so it’s important that everyone see the questions people ask as well as the answers. To join this group, message me from my page and I will show you how to join.
Here we go!
General Info:
Shot taken around 11:30 am with a south facing window. It was cloudy outside. The wall had windows which started about 3 feet off the ground so we had lots of light in her bedroom. The child was about 5 feet from the window lying on the ground face to the window (don’t stand too close as you may blow out portions of your subjects skin).
I do all natural light photography. People wonder how in the world I do it without a studio. Do I get lucky and have fantastic homes, etc etc. Yes, I do get lucky with some amazing homes which provide lots of opportunities for light. However, its’ about 50/50. I seek the light. All homes have at least one window with some light. I am known for rearranging entire houses and totally moving furniture (yes we find lots of cheerios under couches 🙂 ) into other rooms, just to get my light! When you see a window and you have some light anyone can do this. You may have shadows, but shadows rock! (if used correctly 🙂 ) Oh….and I spot meter. Yeah it’s hard, but I’m a girl who loves a challenge to get the results I want!
Camera/lens:
Nikon D700
50 1.4 G
Settings:
ISO: 1200
F/2.8 (Had I shot this over I would of brought it down to 1.8, but she was moving a TON so I had to keep my shutter speed faster and didn’t want to risk her being out of focus)
1/320s
Spot metered
Calibrated computer to my print company (a MUST HAVE before anything is accomplished below)
Ok now that all that is out of the way, let me post my before and after photo. The before photo is in camera raw and straight out of the camera (SOOC). In this case I had it on auto WB as she was in and out of different hues in the room so it’s easier with a moving child. Doing a custom WB with moving children can be difficult so you need to use auto knowing you MAY have to tweak it a tad in your camera raw program on your computer. Some will argue this point with me, but this is just the way I do it . This one I brought from 6200 to 6100 in my camera raw program. That was it 🙂

Step 1:
I always, ALWAYS do the skin first. The first thing to assess is blemish control. This sweet pea had a cold so had some rashy stuff around her face etc. Here’s how I fix that…are you ready? The PATCH TOOL. Yep! That’s it! Here’s how it works:
1. Make a new layer (command or control J). I ALWAYS make a new layer because if you mess up you can delete the layer and not have to go back in your history panel a million clicks.
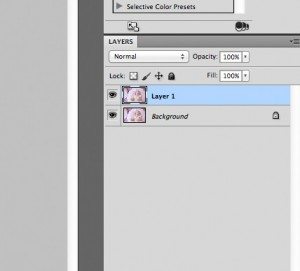
2. Enlarge the area of your photo to a size where you can see everything. This one I enlarged past the actual pixel size (seen below)
3. Click on the patch tool. The patch tool allows your to circle the bad skin and replace it with good skin. (make sure the source button up top is selected and not the destination. This will allow you to replace the bad spot with a good spot). 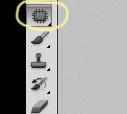
4. Circle the BAD area you want to go “poof”
5. Drag it to an area of the skin thats pretty that has similar skin tones (it will replace the part you circled)
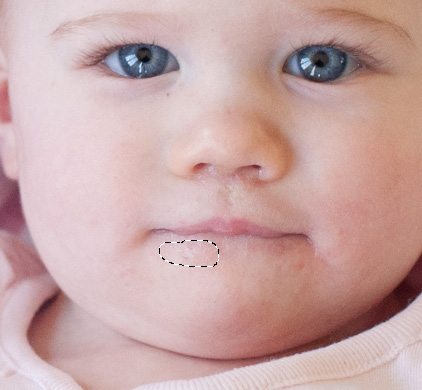
6. Continue this trick to all areas of the skin you want blemishes removed.
7. Flatten.
Step 2:
Skin softening. Hooray!
Guess what. I use an action (EEEK)! I used to use Gaussian blur tool (an old post, sorry for all whom are all still doing it that way but it was taking me WAY too long). The Coffee Shop Blog has an amazing action for skin which is FREE! Yes free. Tell everyone!!! It’s called Powder room 2. I use it and I’m proud to say I do. It rocks. That being said you need to know how to use it correctly because you DON’T want your kids to look like porcelain dolls…just saying. 🙂
Here is what the action looks like open:
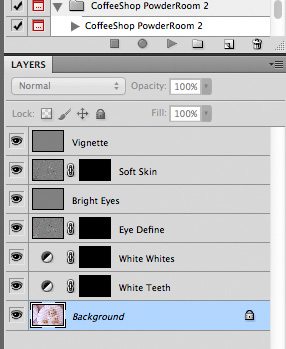
1. Get your soft brush and click on the soft skin layer (the black part on the action). Make sure your brush has the white foreground color so you are painting it on and not taking it off. If it’s black it won’t do anything. (If you mess up you can switch it to black to erase off what you have painted on.).

2. Set your opacity of your brush to about 30%.
3. Brush the soft skin part of the action onto your skin. Don’t touch the eyes or the hair or lips or the bottom of the nostrils. Avoid any area that should not be too soft. You can then use play with the other parts of her action in very low opacities, but I just use this part of the action.
4. Take a snapshop in the history panel of your photo. I do this after EACH step incase I need to back to where I was before I flattened an image. This part is very important to me when I edit. (click on the little camera at the bottom, then you will have a snapshot in your history panel where you were before you flattened your image and can revisit any time during your editing process. You don’t have to do this but when I edit I sometimes backtrack.

5. Flatten your image
Step 3:
Eyes. Let’s make em sparkle!
Here’s the deal friends. You can NOT fake sparkly eyes. Nothing about my editing process is fake. In order to have great sparkly eyes you have to start with them. Take a look at my before photo. You can see her eyes started sparkly. You can actually see the windows in them. You have to start with them like this. Another reason to practice practice practice your camera skills! PLEASE don’t lighten the eyes to create false catchlights. Blah. 🙂 Ok enough on that…let’s enhance those beautiful blue eyes of hers! So what’s the secret?? LEVELS!
1. Click on the levels button

2. Bring up the exposure until the eyes look bright. This one went up to 1.22 to the left. You will notice your entire photo will be WAY too bright. Don’t fret. We will fix it. See the example below:
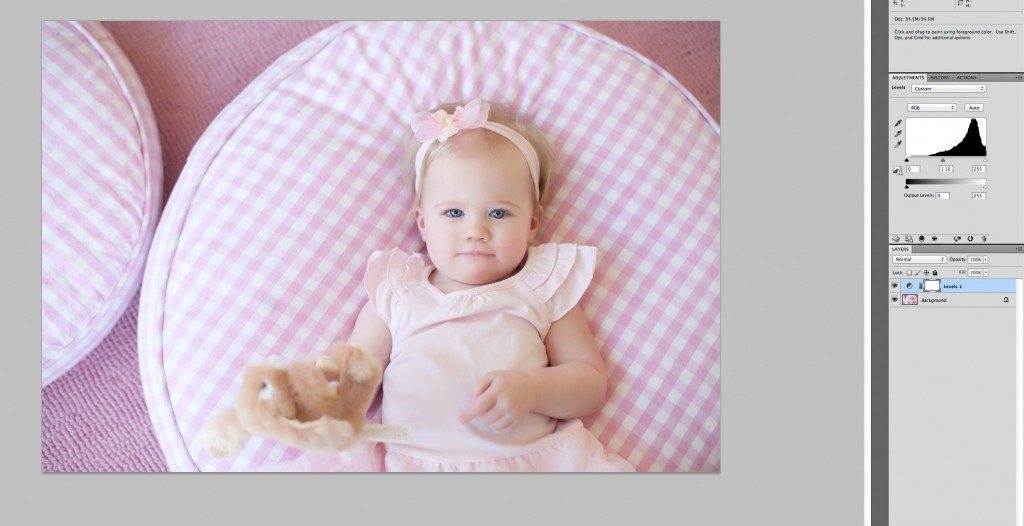
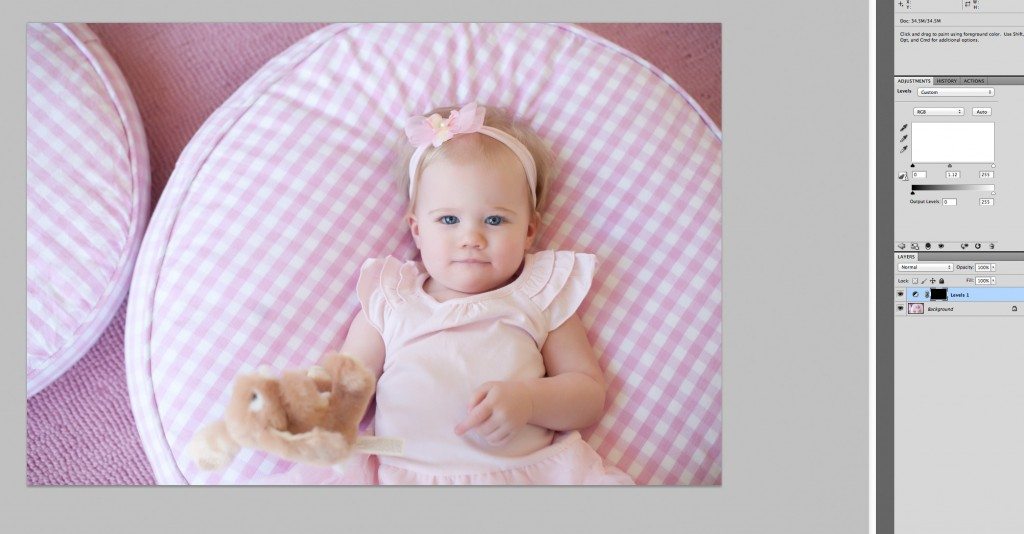
3. Notice how your levels button is WHITE. That makes your entire photo brighter. We don’t want our entire photo that bright. So what we need to do is switch the little box to black or invert the color. I use the shortcut command+I. Then it will be a black box and your photo will look like it looked before you ran levels. See below:
4. Zoom in SUPER close to the eyes. You don’t want to “paint” on the brightness onto her skin (you will know how good of a photo you have when you enlarge it this big WAY past it’s actual pixel size! 🙂
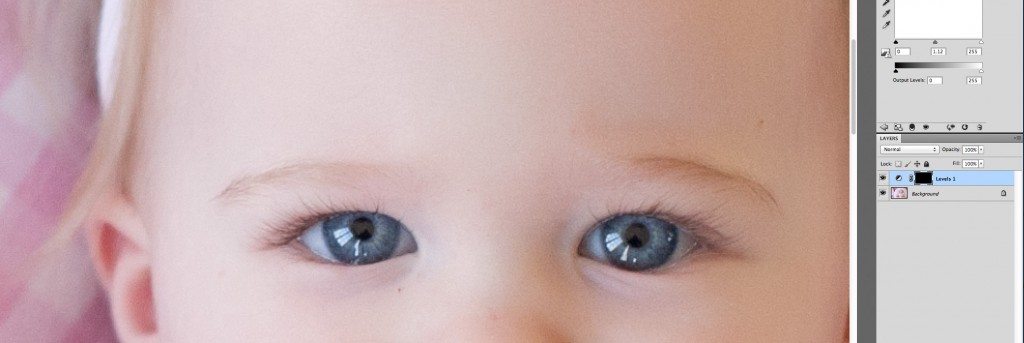
5. With a soft brush, again the foreground set to white so you are painting ON to the black background, paint, or “highlight” the catch lights as well as part of the iris. I play with these opacities. The catchlights sometimes around 30% and the iris around 10-15. You don’t want it looking fake. You are just enhancing. You can also sharpen the eyes as you see fit but I sharpen at the end and I have found that if you over sharpen the eyes the look like alien eyes. Just saying 🙂
6. Take a shot in the history panel.
7. Flatten Image.
Step 4:
Warming. I almost always warm up my babies skin just a TOUCH. Not a lot. Some may not even notice the difference, but there is a huge difference when you do this for print. It’s just in my bag of tricks and I’m now sharing this with the world. Oh well. I love it 🙂
1. Make a new layer (see above)
2. Run a warming filter. To do this click on “image”, “adjustments”, “photo filter”, then pick your filter! You have a few to choose from. For this one I chose warming filter 81. It’s soft and went well with her skin. See below:

3. Change the density to what you wish. I use around 30%. Make sure you leave the luminosity checked to say put. Just trust me on this 🙂
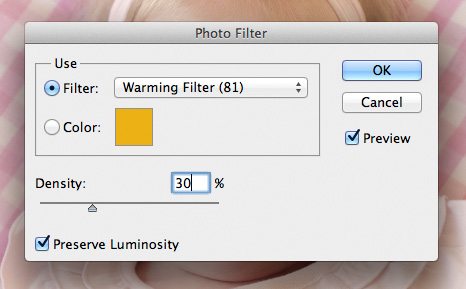
4. Bring down the opacity to what you think looks good. I like a HINT of warming so with this photo I brought it down to 14%.
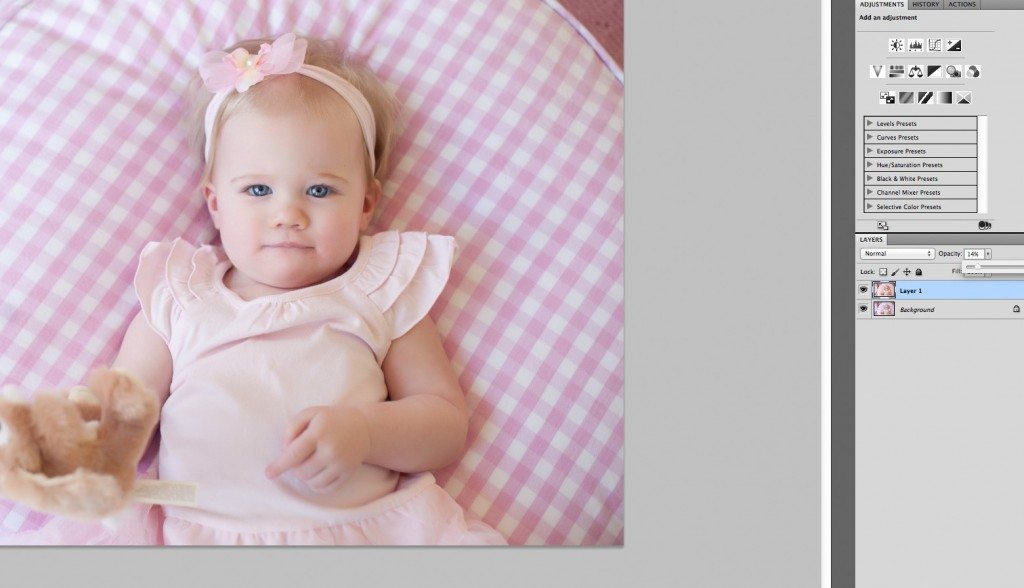
5. Take a history snapshot
6. Flatten
Step 5:
Brighten. After the warming filter was run I felt like this photo now needs to be a TOUCH lighter. Probably not for the web, but for print for sure. You need to keep that in your mind at all times. You computer has a light behind the screen making your photos look bright and vibrant. When you print, light is hitting your photo versus coming from it. That being said I always keep my photos bright (if thats the look of your photo).
1. So to do this I run levels again, but leave it on the entire photo. If there was an area that was too bright I would paint it off the layer mask. I would google layer masks and get really familiar with them as they will be your best friend. Here is a snap shot of my levels being run.
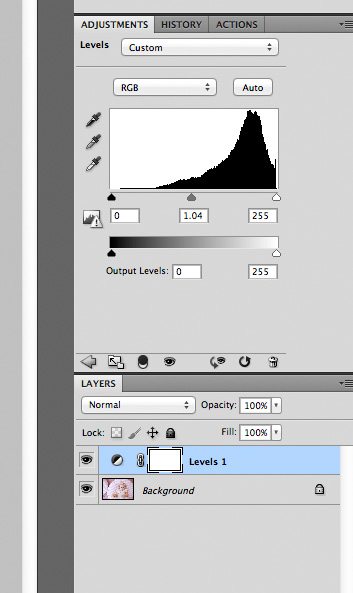
2. Take a snapshot in history
3. Flatten your image.
Final Step:
Sharpen for print. This ALWAYS needs to be done for print. I always add a layer first because I will end up sometimes bringing down the opacity. For this photo I left it as it was. You can play with the settings and come up with your own, but for this photo here is what the unsharp mask with my settings looks like:
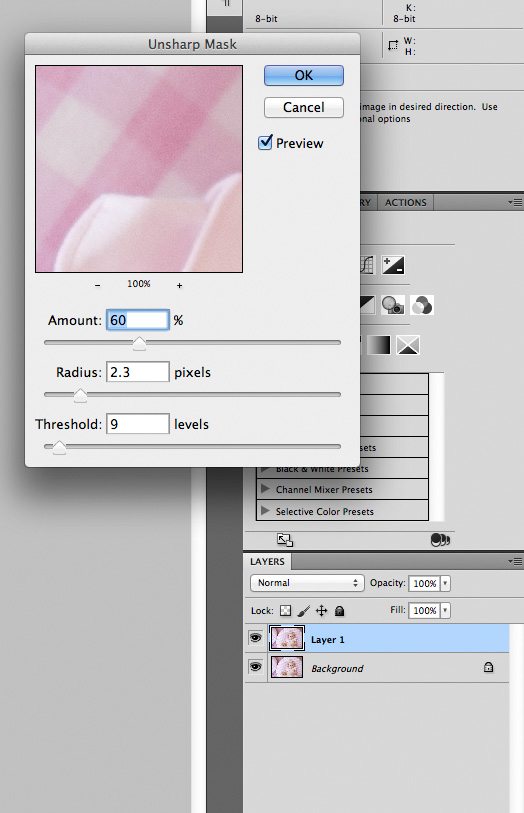
And there you have it! Even though this tutorial talks about each step like it’s long, because I know what my workflow is, I can do this in just a few minutes. Granted, I do play with photos and add more fun affects, but those are all things you don’t HAVE to do to have a clean edit. This is most simple way for me to edit when editing babies in nice clean natural light.
Again, here is the before and after I talked about above, as well as another before and after where I used the exact same steps:
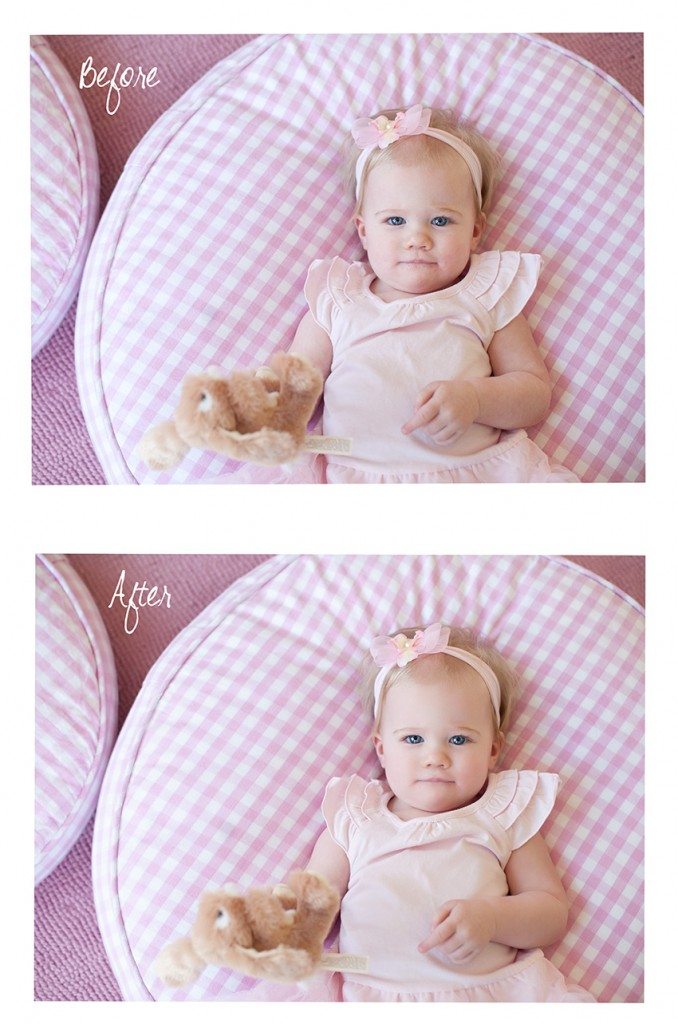
#2 🙂

Oh….and because photos with fantastic natural light look so great as a soft, low contrast black and whites, I figured I’d show ya just for fun, seeing I LOVE a good black and white photo 🙂 I have been working very hard on my black and white conversions, finding just the right adjustments. So for now, this one will be one of my secrets 🙂

Easy peasy huh?
I hoped you liked this tutorial. I have a new group on FaceBook dedicated to questions and answers. I really hope you come on over and join us. It’s a group of photographers who can all benefit from others as I still continue to do as well. I am totally self taught and I really want to help others maximize their potential in photography. This group will be a spot where everyone can ask questions to each other and I will chime in when I can. If you would like me to specifically answer a question for you, make sure you tag my photography page so I see it on my news feed. I’m more than happy to help as much as I can and as frequently as I can as well. My dear friends Erin from Ell Photography, and Rachael from Rachael Myers Photography, will also be moderating the group and helping me to answer questions I may not have the answer to, or if I just am totally swamped at the time. I do hope you come and join us as I think this is going to be such a fantastic spot for me to help you as well as other photographers to help each other! To join, make sure you join my Facebook page first, then message me to join. I will then give you directions on how to do so as it’s a closed group for photographers only.
Happy shooting!!!

Emily,this is great. I’m going to print out for a reference and find time to practice!!!
I’d love to join your new Facebook group. I wasn’t sure if I should contact you here or comment on your Facebook post.
Jennifer
Hi! Just shoot me a MSG on my fb page:)
WOW! This is great. Thank you so much. I do something similar and use Powder Room also. Great tips. 🙂
This is amazing
Thank you!! I have become obsessed with getting the perfect clean edit I cannot wait to try this one
Hi Emily,
I haven’t been on FB for quite some time, due to some medical issues, and was so excited to see that you are now doing workshops and tutorials. I have always been a big fan of your work. I loved your clean edit tutorial above.
Tracy Smith